How Does an Aws Iot Button Get Read on a Router
Using Iot-Push to command my kids net usage
As with the majority of parents, my wife and I are annoyed by how much fourth dimension our two kids were spending on the Internet. I have tried different basic parent control systems, only I did not like having to install an app, nor did I find it piece of cake to make them flexible, every bit I had to extend the time when my kids had valid reasons to use the Internet. Ane twenty-four hours my married woman said to me "Wouldn't it be nice to have a device that would close down their internet, similar clicking a button."
Light-seedling moment! I had an IoT-Button sitting on my desk; which I didn't put to a proficient use. I just continued the dots and gave myself a pet project.
This mail service explains how I brand my wife's dream come true. Yous know, happy wife happy life.
Requirements bated from an AWS account
- Iot-Button
- Home Router firmware configured with OpenWRT
- A weekend to spend
IoT-Button Device Config
For this personal project, I decided to utilise ii IoT-Buttons; One for my married woman and another one for me.
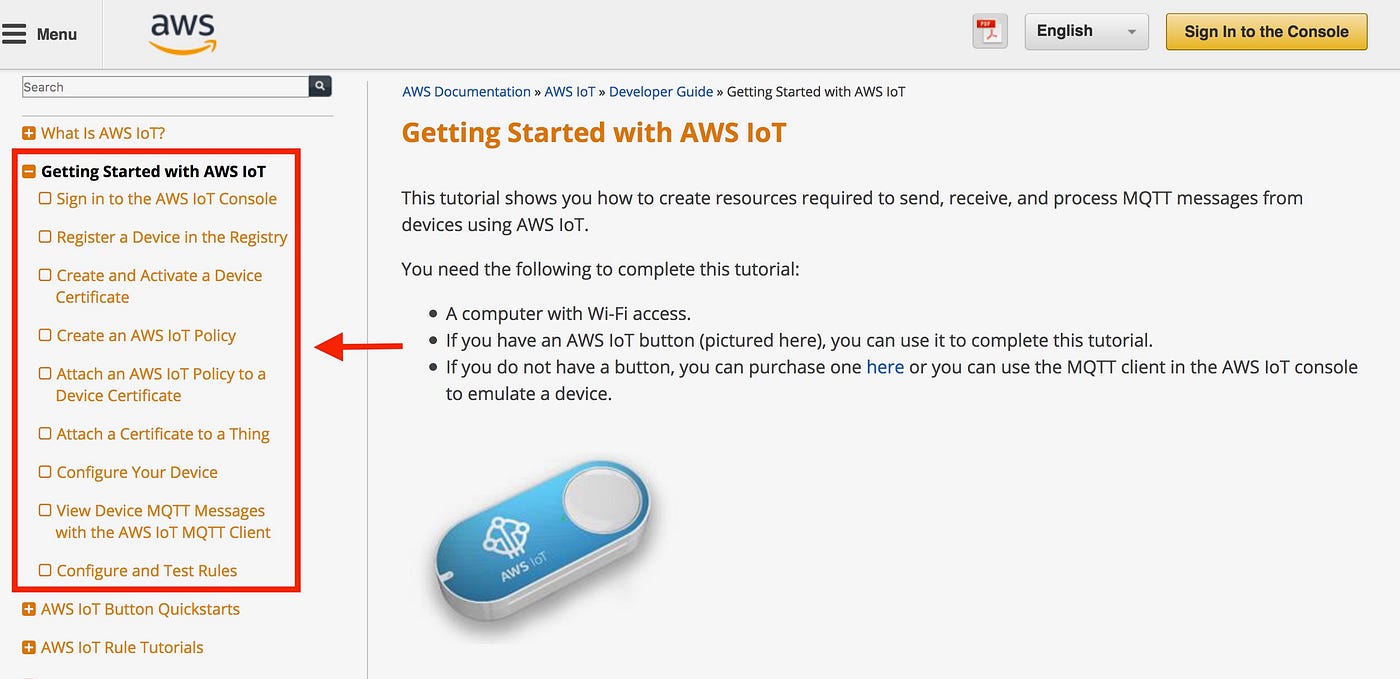
Let's start by accessing the Getting Started with AWS IoT URL (delight click on the link). This site provides all the details you need to configure your business relationship and IoT-Button. Delight follow all the steps listed on the left panel of that site (see the screenshot below). In the last step, during the Configure and Test Rules, do non create the AWS IoT Rule. Nosotros will practise information technology subsequently.
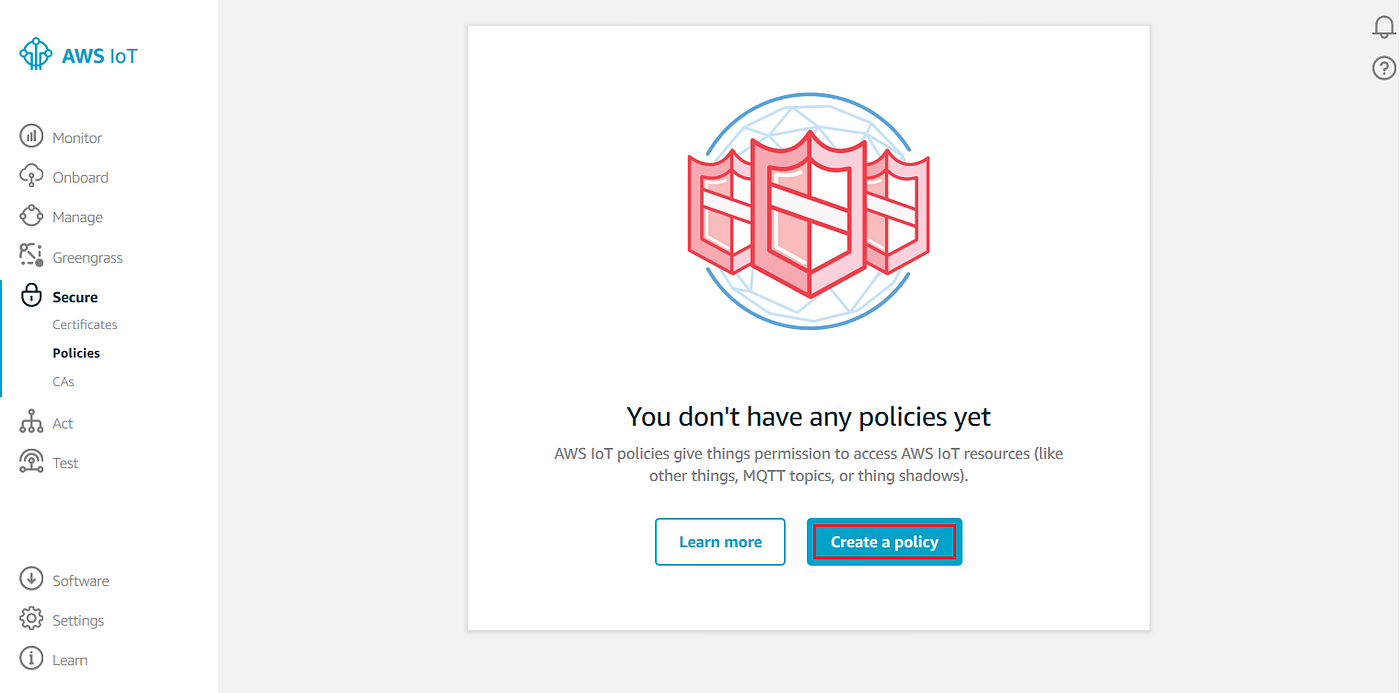
Once yous have configured your account and devices, we need to create another AWS IoT policy for the purpose of this experiment. Back to the AWS IoT Panel, permit'due south create a new policy:
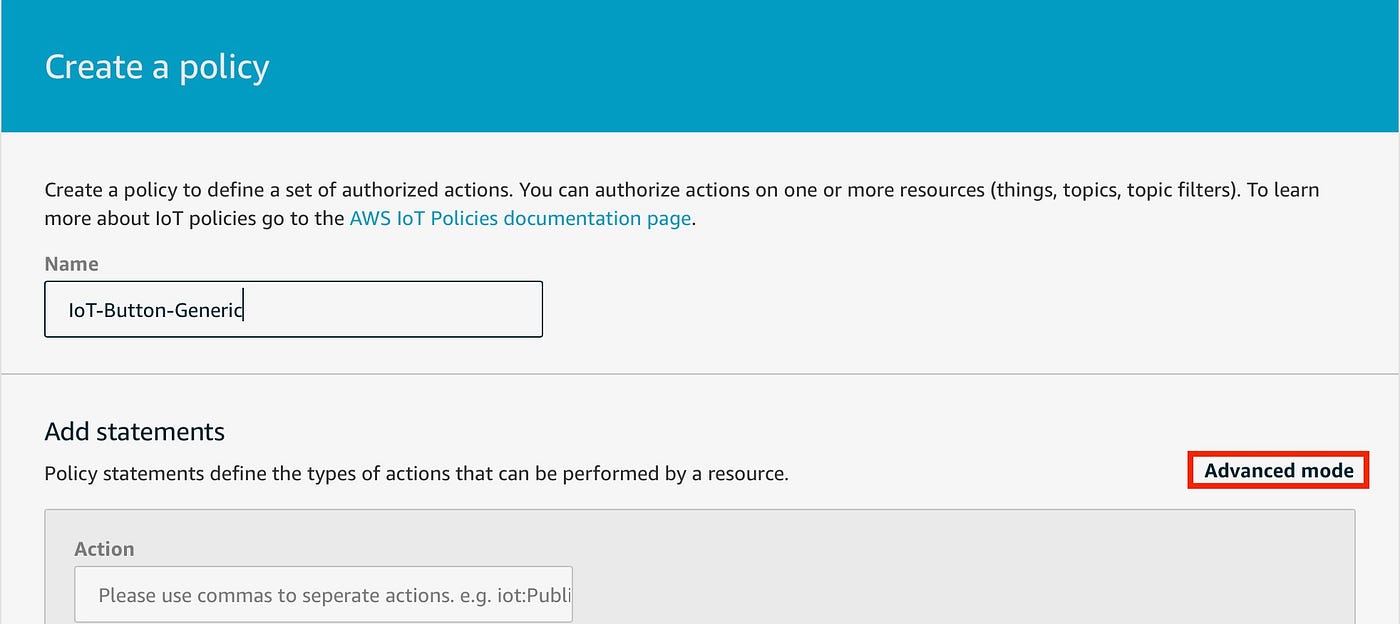
- On the Create a policy page, in the Proper noun field, type a name for the policy (for example, IoT-Button-Generic) and click on Advanced mode:
two. On the Add statements section, paste the lawmaking found below by adding/replacing the following items, and after you have entered the updated policy, cull Create:
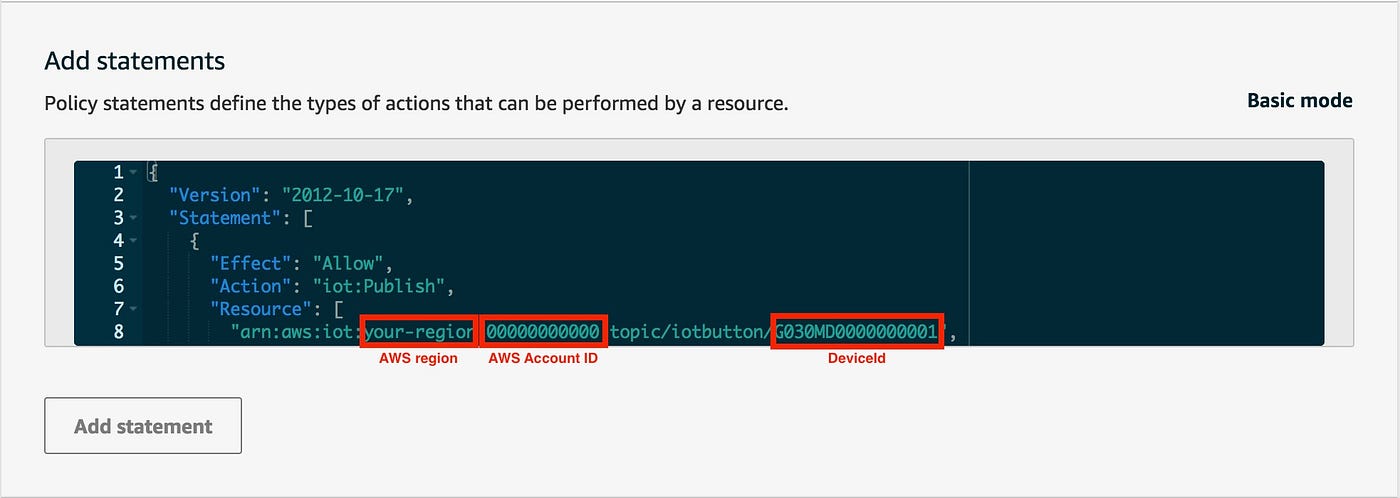
- AWS region that your IoT service is running on,
- AWS account ID
- IoT-Buttons device ID. If you are non sure re-check the Configure Your Device page.
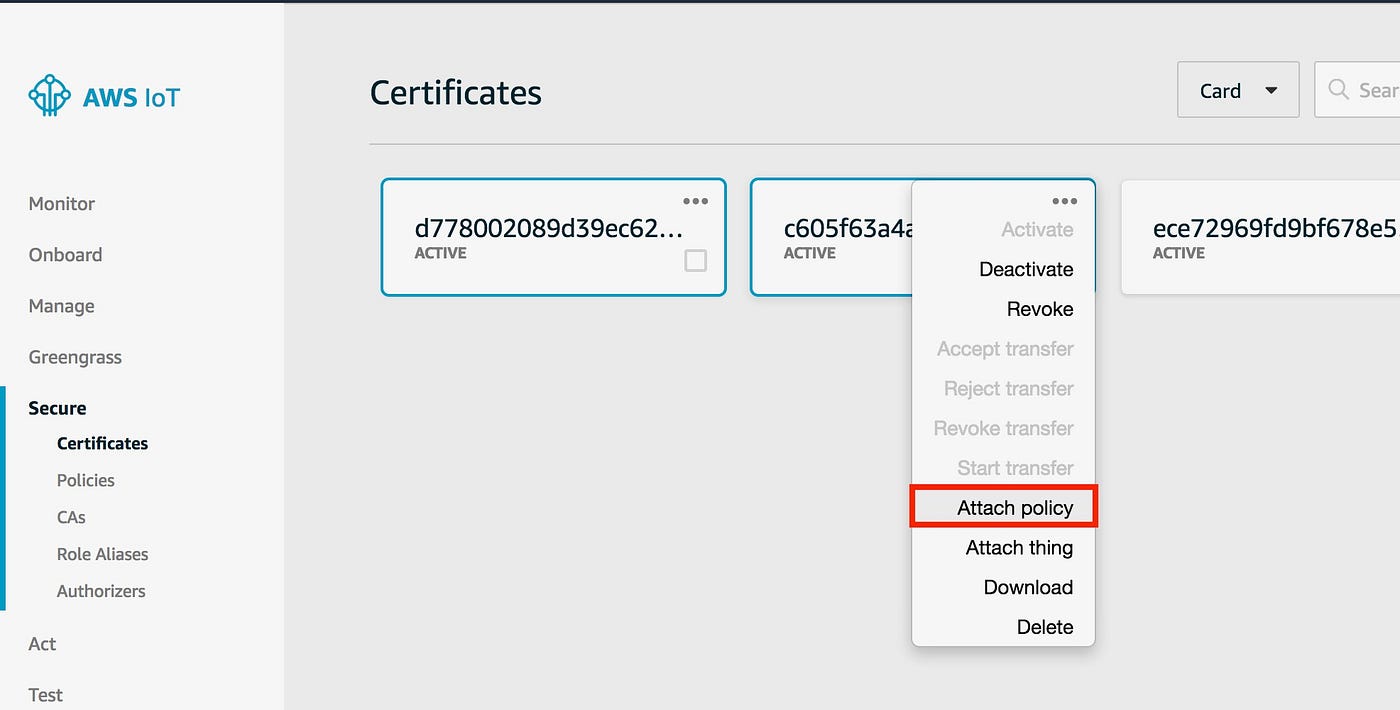
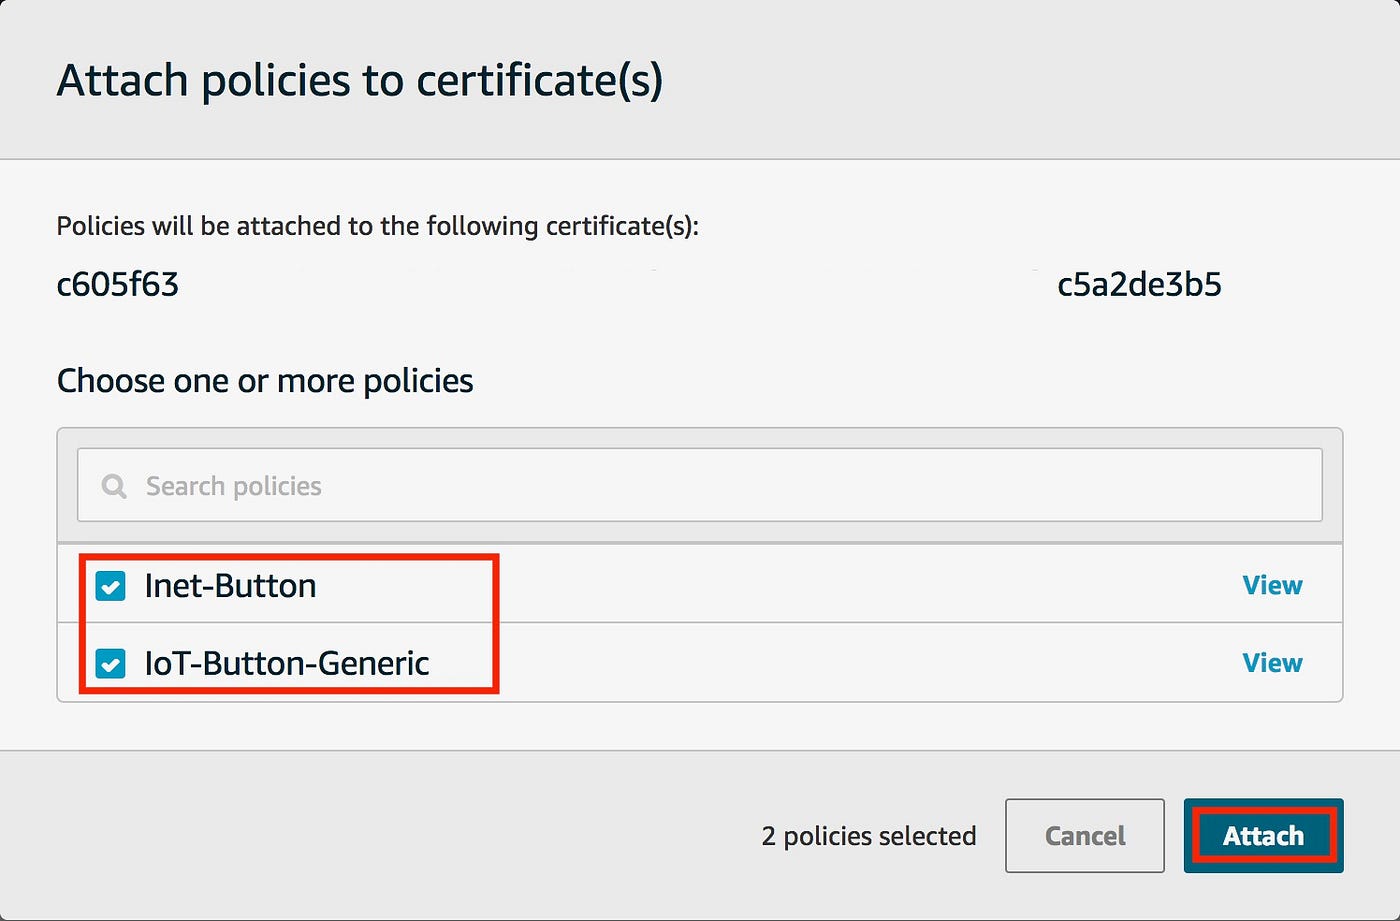
3. Attach the new policy to the IoT-Buttons' certificates:
OpenWRT installation and configuration
I have to warn yous! Install OpenWRT at your own adventure. To give you a sense of how difficult it can exist, some people had to use SFTP to upload the firmware to the router. The installation/configuration of OpenWRT is out of the scope of this post.
Mosquitto MQTT
Assuming that OpenWRT is upwards and running, and nonetheless accept Cyberspace connection; the next step is to install mosquitto MQTT into OpenWRT so we can interact to AWS IoT Core.
Use an ssh connexion to access the OpenWRT router as a root user. Install mosquitto running the post-obit commands:
          opkg update
opkg install mosquitto mosquitto-client libmosquitto
The next footstep is to create the OpenWRT router as a "thing" into the AWS IoT.
- Follow the same steps divers at Register a Device only include the OpenWRT in the name so you recognize information technology.
- Create the document and download them to your local auto as shown at Create and Activate a Device Document.
- Attached the policy nosotros have created earlier using the Attach an AWS IoT Policy to a Device Certificate as reference.
- Using SCP re-create the certificates you take downloaded in stride 2 into your OpenWRT, including the root CA. I chose to copy them to /etc/iot, as in the snippet below.
          scp 1387544b4c-certificate.pem.crt root@OpenWRT:/etc/iot/.
scp 1387544b4c-private.pem.central root@OpenWRT:/etc/iot/.
scp root.ca root@OpenWRT:/etc/iot/.
Creating AWS IoT Rules
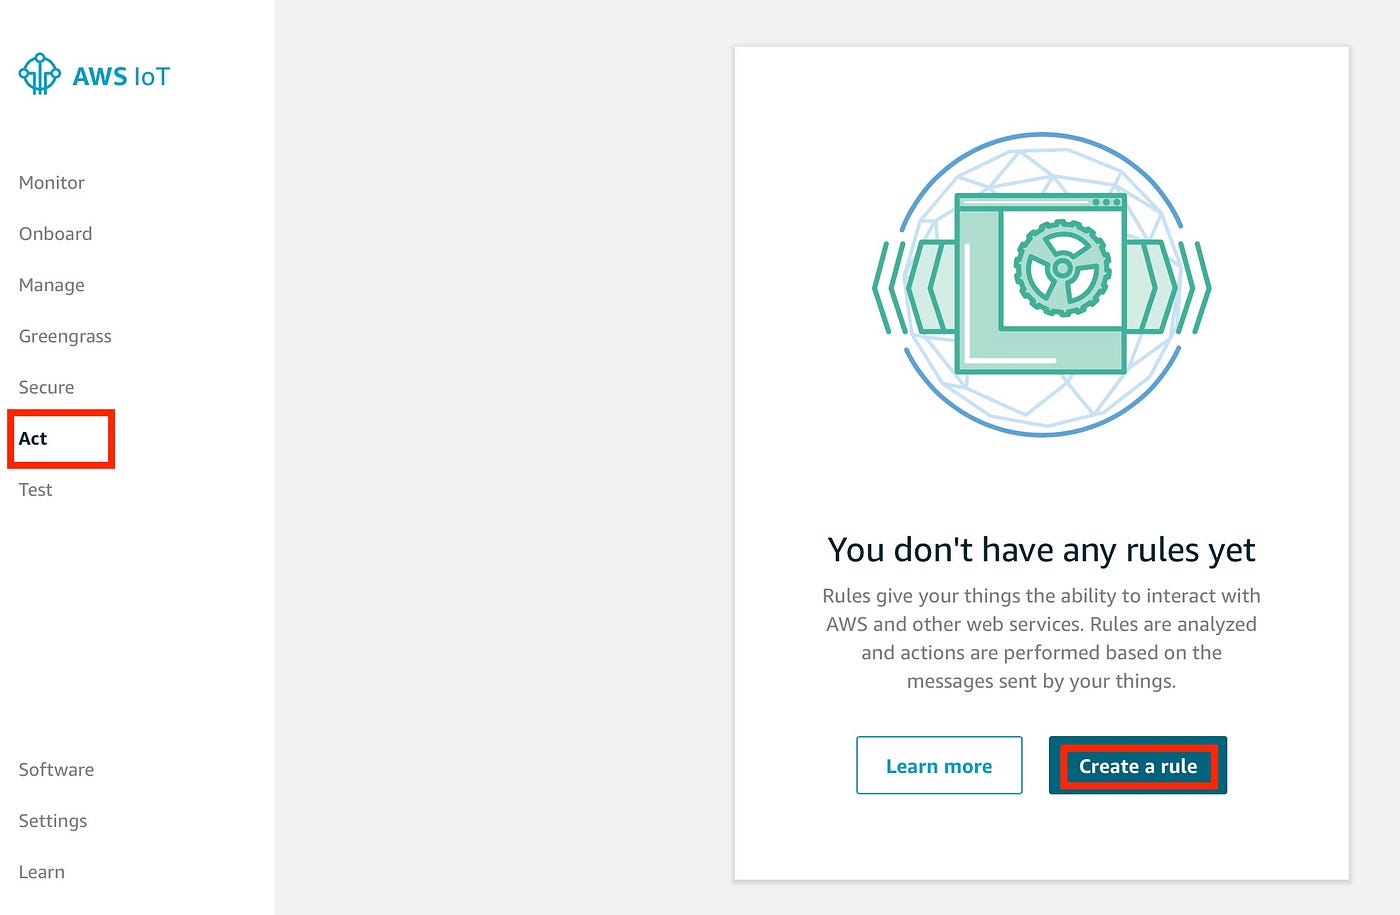
Rules give your devices the ability to collaborate with AWS services. Rules are analyzed and actions are performed based on the MQTT topic stream.
Allow's create one rule with two actions:
- On the AWS IoT page, choose Act and select Create a dominion:
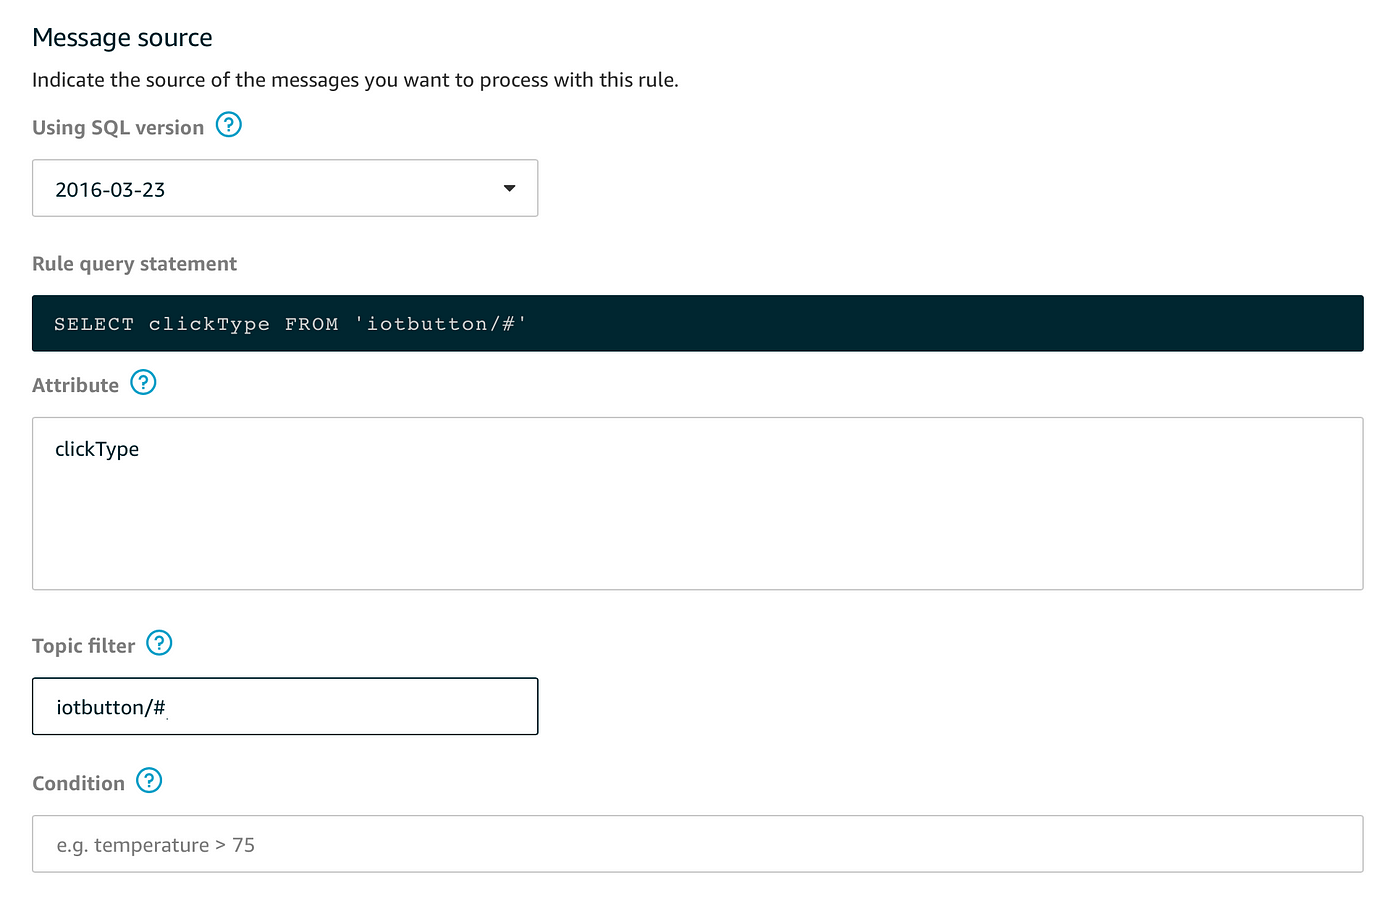
ii. On the Create a rule folio, in the Name field, type a name for your rule. In the Description field, type a description for the dominion. Scroll downwards to Message source. Cull the latest version from the Using SQL version drib-downwardly listing. In the Attribute field, type clickType. This specifies that you desire to send the entire MQTT message that triggered the rule. The rules engine uses the topic filter to determine which rules to trigger when an MQTT bulletin is received. In the Topic filter field, type iotbutton/#
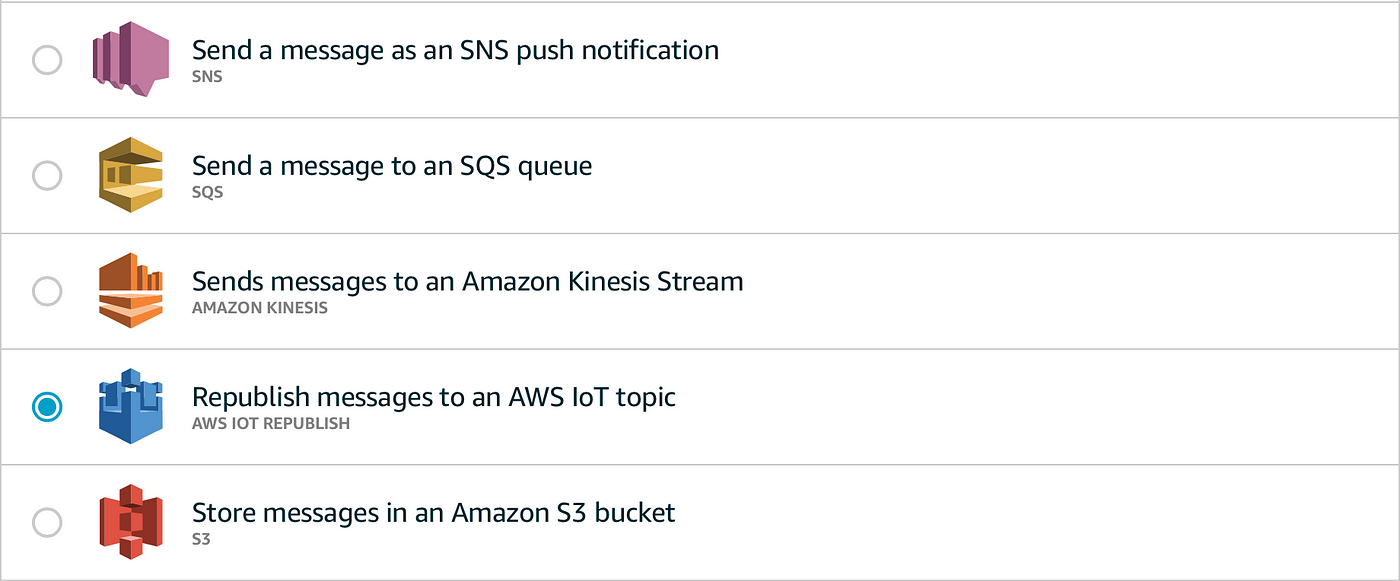
3. Still on the same page, in the Set one or more than actions section, cull Add together action

4. On the Select an action page, select Republish letters to an AWS IoT Topic, and and then choose Configure activity
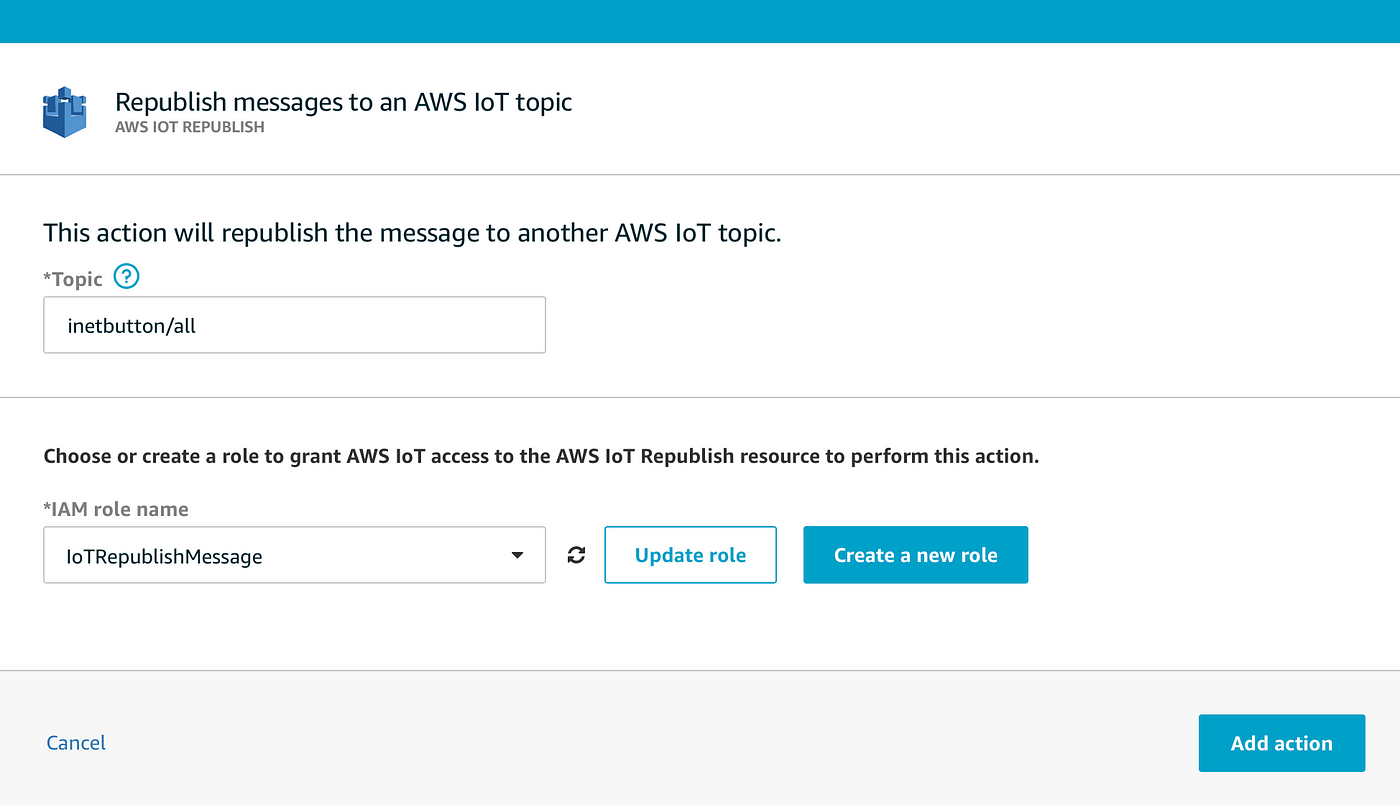
5. On the Topic, blazon inetbutton/all. Nosotros will use this topic to amass all messages created from the different IoT-Buttons you may have. Type a unique proper name in IAM function name, and then cull the Create a new role button again. Cull the role you but created, cull Update role, and so choose Add action.
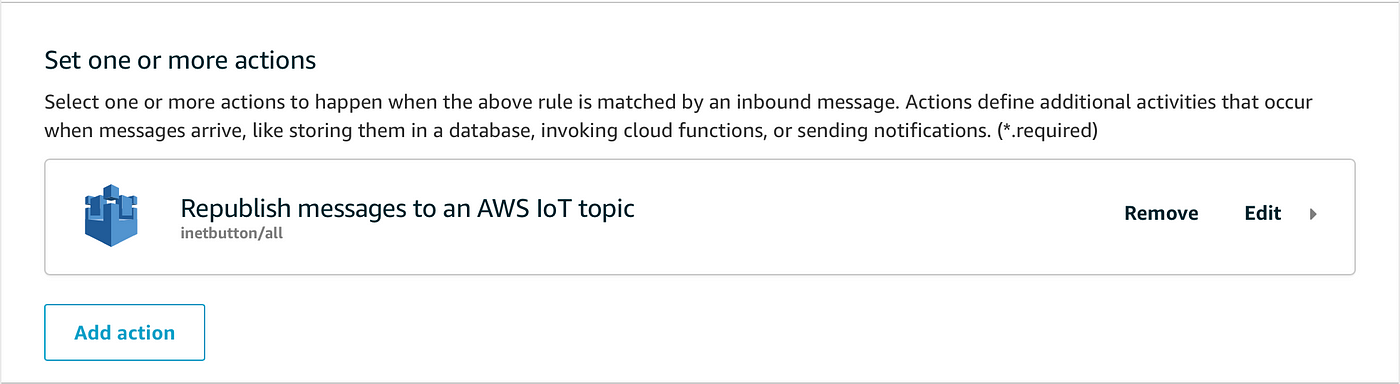
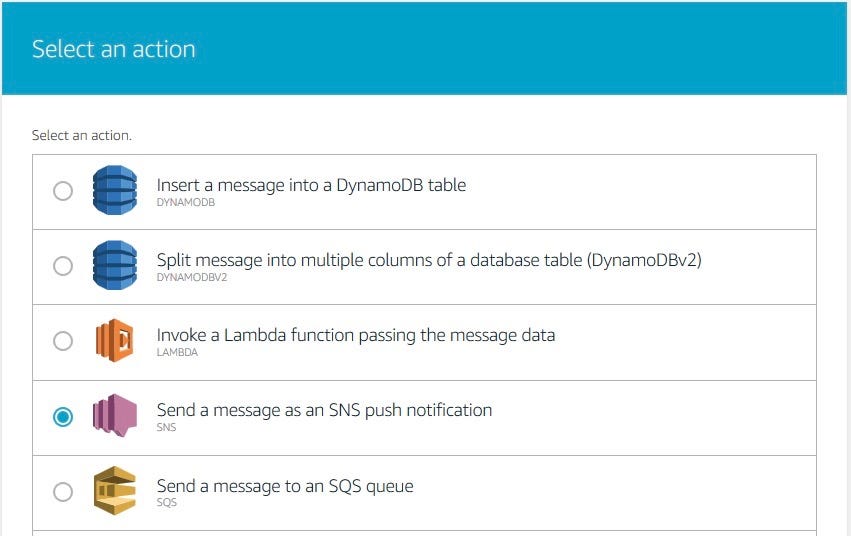
6. To add together one more action, in the Set 1 or more than actions section, choose Add together action over again.
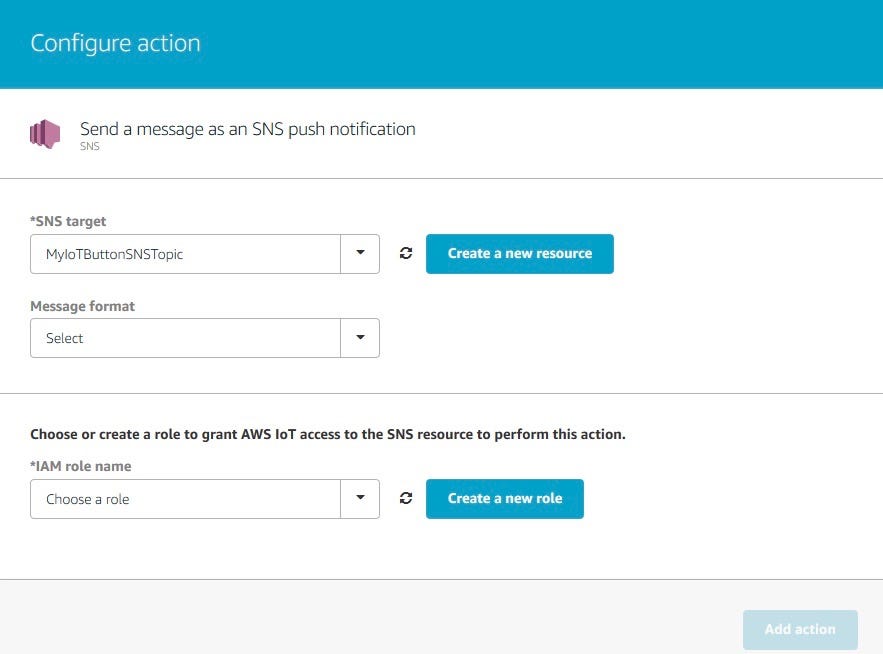
7. This time permit's select Send a message equally an SNS push notification.
8. On the Configure action folio, from the SNS target drib-down listing, cull the Amazon SNS topic you lot created earlier on the Configure and Test Rules stride. Similar to step v, choose Create a new role. Enter a name for your new role in the IAM part name field. Subsequently you have entered the proper noun, choose Create a new role once again. Select the newly created role from the IAM role name drop-down list, choose Update part, so cull Add activeness.
9. Finally, On the Create a Dominion folio, choose Create dominion.
Testing Mosquitto MQTT
You haven't given upwards on the OpenWRT configuration part, and fabricated this far, spike your seatbelts and let's run across some activeness.
- SSH to the OpenWRT and run the command below. Brand sure to point to the correct AWS IoT endpoint and certificates.
mosquitto_sub --cert /etc/iot/aws.certificate.pem --key /etc/iot/aws.individual.pem.key --cafile /etc/iot/root.cer -h your-endpoint.iot.us-west-ii.amazonaws.com -p 8883 -q 1 -d -t inetbutton/all -v
ii. If yous run across the following output, it means that your mosquitto_sub successfully connected to the AWS topic inetbutton/all
          Client mosqsub/2674-OpenWrt sending CONNECT
Client mosqsub/2674-OpenWrt received CONNACK
Client mosqsub/2674-OpenWrt sending SUBSCRIBE (Mid: ane, Topic: inetbutton/all, QoS: i)
Client mosqsub/2674-OpenWrt received SUBACK
Subscribed (mid: 1): 1
3. Press your AWS IoT-Button. if you meet the message below, yous can start celebrating. Your IoT-Button is sending the bulletin to your router.
          Client mosqsub/2674-OpenWrt received PUBLISH (d0, q0, r0, m0, 'inetbutton/all', ... (22 bytes))
inetbutton/all {"clickType":"Single"}
Mapping the clickType with IpTables rules
The style I control the Internet access of my children is by blocking the MAC address of their devices. This is how 99% of the current parenting control systems operate anyway. I won't discuss whether this is is the appropriate mode of filtering devices. Nonetheless, on that note, if my son is able to spoof a MAC address he deserves his internet access.
OpenWRT comes with IpTables, which allows me to inject firewall rules at the fourth dimension a message arrives. AWS IoT-Push provides your three pick — unmarried, double and long click. These trigger commands to exist executed. The table below summarizes the relationships between the triggers and actions.
Putting it all together
The steps below configure the OpenWRT boot initialization to start the mosquitto subscriber that is connected to the AWS IoT service and the scripts that alter the IpTables firewall rules on-the-fly.
- On the OpenWRT shell, go to /etc/init.d and create a file named awsiotsub. Copy and paste the content below to the file and go far executable by running chmod +x awsiotsub.
After creating the file create a soft link on /etc/rc.d directory by running the control:
ln -s /etc/init.d/awsiotsub /etc/rc.d/S90awsiotsub ii. Still on the OpenWRT trounce, create the mosquitto_sub.sh file at /etc/iot folder
iii. Identify all the MAC Address you would like to filter and add them into /etc/iot/srcmacs.csv. Information technology is easier to add more MACs as you take more devices to filters in the future. The options column is non withal used, but the idea is to provide information for the iptables options in example you want more granular control, similar denying access for but two hours.
                      /etc/iot/srcmacs.csv
device,mac,options
kindle,10:AE:60:00:00:00,none
son1 computer,3c:95:09:00:00:00,none
son2 reckoner,34:68:95:00:00:00,none
4. Create the files /etc/iot/click-ctl.sh and /etc/iot/resetfw.sh. These scripts get triggered by the mosquitto listener and modify the firewall rules automatically. More information in how to configure your IpTables rules can exist found hither.
4. Start your mosquitto listener by running:
/etc/init.d/mosquitto-sub starting time Now you lot should exist able to control your kids' cyberspace access past the click of a button. Not much joy for them, only the parental regime is intact.
In the side by side blog post I'll dissect how yous can employ the mosquitto publisher to send information from your OpenWRT router to AWS S3 to go detailed information of what your family unit is accessing on Internet. Spoiler alert, you may non desire to know.
Cheers for reading.
fanninussighboult.blogspot.com
Source: https://medium.com/@arturlr/using-iot-button-to-control-my-kids-internet-usage-5bd825c1da76
0 Response to "How Does an Aws Iot Button Get Read on a Router"
Postar um comentário